Benchmark your PC
Download and run the SteamVR Performance Test. This gives a VR-focused benchmark letting you to know what to expect in terms of performance and what to target graphics settings (e.g. supersampling) towards.
Purchasing
Don’t buy your Vive directly from HTC or through Steam. Use Amazon or a similar store with a more reputable RMA process. It will be priced similarly everywhere. Physical retail stores may have discounts and are worth investigating if you’re near one.
Read Valve’s Setup Guide
Reading Valve’s Vive Setup Guide will familiarize you with all the components and overall setup process.
Update your Drivers
Get the latest drivers for your GPU. Go here for NVIDIA. Go here for AMD.
Check Your Playspace Size
- Recommended minimum: 2m x 1.5m (6.5 ft x 5ft)
- Recommended maximum: 4m x 4m (13 ft x 13 ft)
- Potential maximum: ~5.5m x ~5.5m (~18.3 ft x ~18.3 ft) Source and Source
 Have a Base Station Mounting Solution
Valve’s Lighthouse Base Station technology is what enables your position to be tracked while in VR. Your Vive will come with two of these, which will need to be mounted in two opposite corners of the room. Proper mounting is extremely important for stable, accurate tracking of your headset and controllers. The Vive comes with its own wall mounting brackets, but these aren’t the best fit if you expect to adjust your space or move your setup at all.
Base Reality’s Guide provides the best overview of the various options with pros and cons for each.
I personally recommend these contractor poles with these quick release brackets. Contractor poles offer excellent stability, minimal footprint (versus light stands), and can still fit under most ceilings.
Base Stations use ¼” mounts in case you have mounting hardware already on hand or plan on purchasing some.
Mirrors, pictures frames, windows, and other reflective surfaces in your play room may cause tracking issues. Consider eliminating these from your space, covering them, or make note of them as potential variables if tracking issues occur.
Measure your Interpupillary distance (IPD)
Your IPD is the distance between the center of your pupils between both eyes. Setting the IPD correctly is important for clarity and preventing eye strain within the HMD. The Vive has a knob on the side allowing you to adjust the space between the lenses to accommodate different IPDs, but it’s important to actually measure your IPD and know the correct value.
Your eyes can adjust to a wide range of IPDs, but it doesn’t necessarily mean those IPDs are correct. IPD is an alignment adjustment, not a focus adjustment. If you have to readjust or ‘uncross’ your eyes when taking your HMD on and off, your IPD is likely set incorrectly and you’re simply acclimating.
If you wear glasses, your IPD should be listed on your prescription.
Alternatively, there’s a simple way to measure your IPD with just a mirror and ruler.
The average IPDs for females is 62mm (57mm-69mm) and 64mm (59mm-71mm) for males. Source
The Vive supports IPDs between 60mm-74mm. Don’t worry if your IPD isn’t within this range. If it isn’t, there will be a bit of softer focus on the extreme edge of the image on one side. Even with a 5mm offset, the lenses can produce a clear image, but if you know what to look for you can see a slight difference. Even an IPD offset of 8-10mm still looks quite good.
What you will see if the lens is not centered, is an increase in stray light. The worst case scenario is looking at white text on a dark background. In that case, you will see stray light halos in the dark area around the white text. In games without sharp contrast boundaries the stray light will be difficult to see. Source
Purchase Accessories
You can browse all accessories in the section below. I personally recommend these the most:
- Deluxe Audio Strap is essential for improving the overall comfort and fit of the HMD.
- VR Covers are especially useful if you expect to do a fair amount of sharing or demoing. They’re easier to clean and covers can be swapped quickly.
- Lense protectors are useful for ensuring longevity of your lenses.
- Round rugs are excellent for marking the center of your playspace and added comfort.
Install SteamVR
You’ll need SteamVR installed in order to use your Vive. Download it through Steam by clicking in the menu on
Library > Tools > SteamVR.
Install OpenVR Advanced Settings
OpenVR is an open-source tool to enable many useful features and integrates directly into the SteamVR settings.
Download the latest release here. Make sure to install it in an empty directory. Source
Install Games
No reason to wait for these to download after you’ve already got the hardware in hand!
Check out the Games section for recommendations.
Don’t Install Viveport (Unless you have to)
HTC’s Viveport software is not necessary to use the Vive. It functions as it’s own app store (similar to Steam), but is known to be unstable and cause potential performance issues.
Currently, some Vives ship with a code for one free month of Viveport Subscription, their $7/month service allowing you to choose five games from their library to play each month. The library is quite small compared to Steam’s, but worth using for the free month for demoing certain games (e.g. Google Tilt Brush).
You’ve got a Vive! Use this information to speed up and enhance your setup process.
1. Snap Your Serial Numbers
Take photos of the serial numbers on the outside your box in the event you need to warranty the hardware.
2. Unpack the Contents
Make sure everything is in the box:
- Headset with attached 3-in-1 tether
- Link Box
- USB cable
- Short USB cable (optional for Headset accessory)
- HDMI cable
- Link box power cord
- Two controllers
- Two controller power cords (USB cord + power adapter)
- 2 Base Stations
- 2 Power cables and adapters
- 2 Mounting kits
- Base Station Sync cable (you probably won’t need to use this)
Leave the clear packing film on the front of your Base Stations for now. This will keep the fronts clean until we finish mounting them.
3. Update the Controller Firmware
Start SteamVR. Familiarize yourself with the status menu, you’ll use it quite a bit. Devices will turn green when connected and prompts or notifications will appear here.
Plug in your controllers with the provided USB cables.
Click on the words ‘StreamVR beta’ or tray icon to open the SteamVR menu.

Under Devices select Update Firmware. Follow the prompts if a firmware update is needed (it usually is).
4. Update the Base Station Firmware
Power your Base Stations so they’re still able to reach the same USB cables attached to the controllers, then connect them to your PC.
Select Update Firmware in SteamVR again. Follow the prompts if a firmware update is needed. You may need to hold a button on the back and re-plug them in, but the prompts will indicate if this is necessary.
Note: It is possible to update the base station firmware via bluetooth, but it’s generally not as reliable a method.
Once your base stations are up-to-date, plug your Vive controllers back into your PC so they can charge until they’re needed again. The controllers don’t come with a full charge and your first play session may be a decent one.
5. Mount Your Base Stations
Screw your base stations into your mounting solution and point them downward at a 30-45° angle from the wall. Ensure a stable fit and stable surface (if your mounting method is connected to the floor). Even slight vibrations can interfere with tracking if they are not secured properly.
Lighthouses can be oriented upside down or right-side up, either will work.
Ensure a proper line of sight between the base stations. You may optionally use the provided sync cable (the long 2.5mm audio cable) between them if this is not possible.
6. Connect the Remaining Hardware
Power your Link Box and connect it to your PC.
Set your Vive in the center of your playspace and plug the 3-in-1 cable into the orange side of the Link Box.
Follow any prompts for potential firmware updates for the HMD.
Place your controllers in the center of your playspace and hold the buttons below the trackpads to turn them on.
Connect the included headphones or your preferred pair to the audio-in cable connected to the HMD.
If your HMD, Controllers, and Base Stations are all solid green and connected properly a Room Setup window should appear.
7. Room Setup
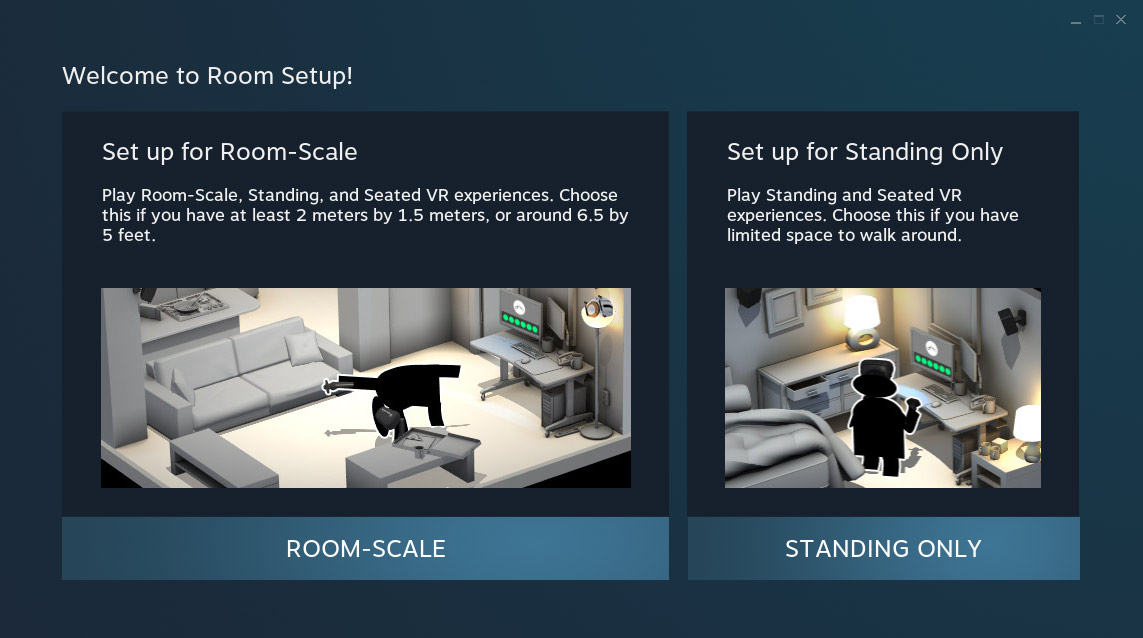
Select Room-Scale (we’ll assume you’re doing this in glorious Room-Scale).
You can follow the prompts using your keyboard and mouse, but using a controller is faster and easier.
With a controller in hand, press down on the right side of the trackpad to select Next, then follow the prompts.
You’ll still need to set the controller back down and use the mouse to calibrate the floor at one point.
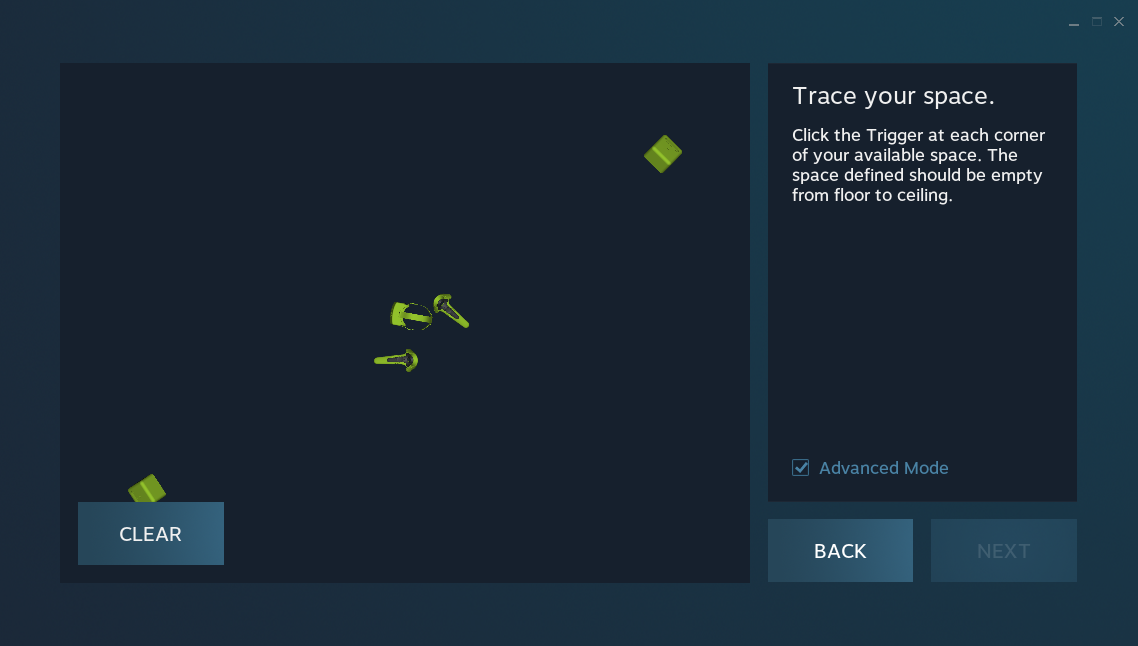
Select Advanced Mode when asked to Trace your space (you’re pretty advanced).
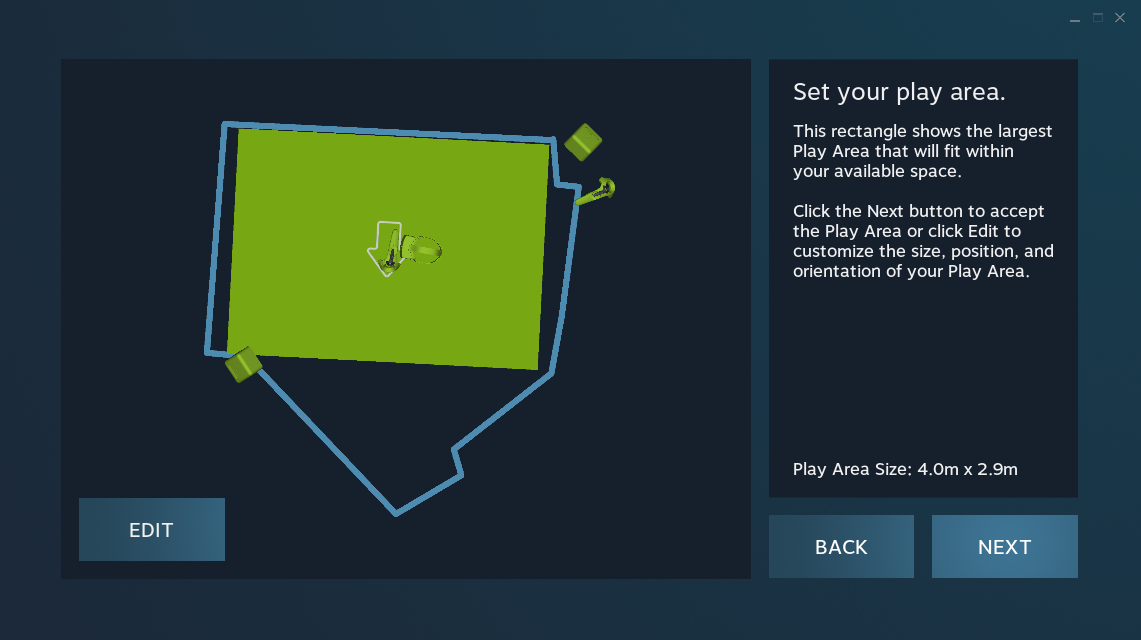
Click the trigger at all the potential corners of the room (there can be more than four). This will determine where the chaperone bounds appear while in VR. You may want to leave a 15-30cm buffer (or larger) between your controller and the wall at each corner for safer bounds. This can be easily adjusted later as well, once you’re more confident with your chaperone bounds. When you’re finished, select Next.

You did it! Slap your headset on go through the SteamVR Tutorial.
Comfort & Safety
These steps can help improve your overall comfort and effectiveness while using the Vive.
General Safety Tips
- Always use the controller wrist straps.
- Don’t play with shoes to prevent damaging the cable.
How to Properly Put on Your Headset
- Pull up on the the 3-in-1 cable until there is sufficient slack from the top headstrap.
- Loosen the top strap as much as it can stay attached.
- Using your dominant hand, place the headset against your face. Then pull the lowest part of the rear head strap below the bony part of the back of your skull.
- Still holding the HMD against your face, adjust the top strap for a snug fit against your eyebrows. The top strap supports the overall weight of the headset.
- Now adjust the two side straps for snugness. It doesn’t need to crush your face, but it shouldn’t want to fall off while turning your head quickly either.
- Optional: Use the side knobs to adjust the screen distance.
- Optional: Use the IPD knob to adjust the lense alignment.
- Reverse this process when removing it. Always pull the back strap up over your head and then remove the headset.
Watch this 30-second video showing how to correctly use the side knobs. The side knobs allow you to adjust the distance of of the display from your eyes. This is especially necessary for people wearing glasses, but also allows those who aren’t to maximize their field of view.
Headset Button
There is a button on the left side of the HMD simply called the ‘Headset Button’ (I prefer ‘Cyclops button’). This functions identically to the controller system buttons.
Using the Camera
Double-tapping the controller system buttons or headset button will enable the Vive’s camera at any time. This is useful for checking your surroundings or finding your controllers and headphones during start up.
Quick Booting and Rebooting
You can start SteamVR just by turning on a controller. While already in VR you can also open the SteamVr menu, select options, and select restart SteamVR to reboot.
Caring for your Lenses
Keep the Vive away from sunlight. Even a modest amount can severely damage the screens inside.
Only use a microfiber cloth (one is provided) when cleaning the lenses. If you’ve never had glasses before, old cleaning habits might lead you to firmly rub the lens surface to clean it, but that’s the worst thing you could do. By rubbing hard, any grains of dust or debris which may have accumulated on your lenses will grind scratches into the glass, which will permanently damage the optics. Consider buying a set of lense protectors if you’re especially concerned with lense scratches.
Handling Sweat
Excessive sweat may damage your HMD. If you sweat quite a bit, make sure to place the HMD with the face pointing upwards so any sweat which has collected on the HMD can drip downwards due to gravity. If you sweat more than average person or simply engage in regular, intense play sessions, consider a sweatband. If you still experience issues, a fan or good air conditioning can help keep you and your headset cool during use.
Linkbox Safety

Consider using a spring clamp to secure the 3-in-1 cables near the linkbox. This ensures if the cable is accidentally pulled too far the pressure will be put on the clamp, not the Link Box or your PC directly.
Rug

A floor rug or mat can be extremely useful for telling where the center of your play space is while in VR. I use a round, shag rug tapped down with gaff tape to prevent it from sliding.
Hide your Base Stations While in VR
I haven’t found a good reason not to hide the base stations while in SteamVR Home. Use this transparent skin to make them invisible.
Adjusting Your Chaperone
Select Settings while in the SteamVR Dashboard in VR and select Chaperone. Here you can changing the chaperone’s color, opacity, and style to something more or less accommodating.
Experiences
Start with The Lab. It’s free and Valve’s made an excellent collection showcasing many great aspects of VR.
Steam’s own What’s Being Experienced is a great snapshot for what’s popular at any given moment.
Red Rock’s VR Flowchart is a great resource if you’d like a guided recommendation.
The Vive subreddit has constant news, updates and offering for new or established games.
I’d recommend everyone try:
- Rec Room (free) – Lots of multiplayer-focused co-op and PVP games. Paintball is a blast.
- Batman Arkham VR ($20) – Fantastic graphics and excellent interactions. You get to be Batman.
- Space Pirate Trainer ($15) – Polished, fast-paced, and great fun.
- GORN ($20) – Hilarious, bloody, arena-based combat.
- Star Trek: Bridge Crew ($50) – Captain your own Enterprise, with or without other players. The inclusion of voice commands is also fantastic.
- Tilt Brush ($20) – Google’s 3D-drawing suite. Huge array of brushes and effects. Easily share drawings online.
Accessories
Demoing
Sharing VR with others can be one of the best parts of owning a Vive.
Preparation
- Re-run room setup and walk around your play space to test the chaperone bounds.
- Confirm the apps or games you want to demo are up to date and working.
- Check your audio devices are set and working properly.
Setup
- Ask the person you’ll be demoing to if they’ve done ANY kind of VR before. Use this information, along with their personal preferences, to establish the best experiences and playlist order for them. I generally run everyone through the SteamVR Tutorial first so they’re familiar with the controls and chaperone bounds.
- Take your time! Tell them to take their time as well. There’s no need to rush anything. Do your best to facilitate their own experience.
- Ask them to kneel or sit down to put on the HMD. This can provide some extra stability and allow them to focus on your instructions on how to put on the HMD properly.
- Optional: Pre-adjust the IPD and screen distance to values you think will be close to their desired settings.
- Optional: Have them close their eyes when putting on the HMD until you have them open them again. This can allow them to focus on the fitting first and not become immediately engrossed in the experience.
- Optional: Turn on the camera so you can easily help them with the controllers after they put on the HMD.
- Demonstrate how to put on the HMD properly by putting it on yourself in front of them. Explain the process in detail as described in the How to Properly Put on Your Headset section.
- Show them the system button and teach them how to double-press it to activate/deactivate the camera.
- Have them put on the HMD. Remove any slack from the 3-in-1 cable and make sure it flows naturally.
- Put on the controller wrist straps and then hand them each controller. Make sure they to put the left and right controllers in the correct hands.
- Run the SteamVR Tutorial from your PC. Once the tutorial starts explaining the dashboard I usually boot up the next experience for them. They won’t need to learn how to use it if you’re running it for them.
Best experiences for older or tech-averse users:
- The Lab
- The Blu
- Destinations (now built into SteamVR Home)
- Google Earth VR
- Google Tilt Brush
Best Games for demoing (my recommendations)
- The Lab
- Space Pirate Trainer
- Raw Data
- Batman Arkham VR
- Job Simulator
- Unseen Diplomacy
Here’s a great flow chart for suggested demoing experiences organized by category.
Audio Setup
The Audio tab in the SteamVR settings on your desktop will give you a few additional options for demoing.
Consider mirroring the HMD audio to your PC speakers so you and others can hear what’s happening.
